Thursday, June 24, 2010

Bagaimana nak buang tulisan PRESS R 2010 FIFA World Cup


Bagaimana nak buang tulisan PRESS R 2010 FIFA World Cup
How to remove Astro “PRESS R 2010 FIFA World Cup”

Anda bosan dengan tulisan PRESS R Astro di skrin tv anda? He..he..he gua pun rasa berserabut tengok tulisan tu.Dah la macam-macam tulisan dan logo kat skrin,semua besar-besar belaka.Tulisan kedudukan jaringan Piala Dunia kali ni juga besar macam gading gajah Afrika.Lagi besar skrin tv,lagi besar tulisan tu.Logo Astro tu memang dah tak boleh buang,yang boleh dibuang adalah tulisan PRESS R yang warna putih dan merah tu.

Mungkin ada yang dah tahu tentang hal ini,namun ramai yang tak tahu terutama tokey kedai tomyam yang pasang skrin besar,gua tengok punyalah besar tulisan PRESS R kat skrin tu.Begitu jugak mamak-mamak yang pasang LCD kat restoran.Depa buat dono je benda ni.Tak ambik pot pun.Yang depa tau bancuh teh tarik dengan tebar roti canai sambil tengok bola.Lepas tu tunggu pelanggan panggil "mamakk!!! kira berapa..."

OK cerita banyak pun tak guna,caranya mudah saja.Langkah pertama,ambik remote control Astro,pegang dengan tangan bukan dengan kaki tau.Sebagai seorang Islam eloklah kita baca Bismillah,selepas selesai membaca Bismillah dengan sempurna,hangpa tekan/press butang G(Green)atau Y(Yellow) atau B(Blue).Ikut suka hangpa nak tekan butang yang mana satu.Kalau hangpa orang PAS tekan la butang hijau,kalau orang BN tekan la biru..kalau kaki MAGNUM 4D tekanla kuning...kah!kah!kah!


Hasilnya amat memeranjatkan beruk-beruk di hutan iaitu tulisan PRESS R ghaib dari skrin tv anda.Barulah sedap sikit tengok bola...keh!keh!keh!


Selamat mencuba!

Sekian saja ajaran sesat gua untuk kali ini...jumpa lagi di lain tahun.

Salam 1Brazil.
Wednesday, June 23, 2010

MACAM MANA NABUAT "READ MORE" PADA SETIAP ENTRY

INI LAGI SATU CARA KORANG NAK JIMATKAN MUKA DEPAN BLOG KORANG. POSTING KORANG TAK PERLU PANJANG-PANJANG UNTUK PEMBACA BROWSE. SENANGKAN...

KLIK READ MORE, TERUS BACA KESELURUHAN ENTRY KORANG.

BLOG NAMPAK LEBIH KEMAS! SELAMAT MENCUBA CHOY...AUWWW!

This is a pretty popular Blogger hack that lots of people have asked me about. Instead of answering to each email individually, I thought it would make more sense to write an article about it.

With this hack, you can choose to display a select amount of text from the beginning of each post as a teaser instead of showing the entire post on the front page of your blog. Then when people want to read the rest of the post, they can click a “read more” link to see the full post. This is very handy if you have lots of long articles all on one page. (Note that you’ll need to have post pages enabled in order to make this feature work.)

Step #1 – Update Your Template Code

First you need to edit your existing code so I recommend copying and pasting it into notepad or any text editor. Also, it’s smart at this point to create a backup of your template just in case something goes wrong. Now do a search (CTRL + F) within the text editor for the following code post-header-line-1. This is the default code that Blogger includes but some custom templates remove or change this code so you might have trouble finding it. If you can’t locate this text then try searching for instead. Your template will for sure have this since it’s the tag that actually prints the body of your post.

Now depending on which code you were able to find will determine how easy the next steps will be. You might need to do some detective work first in order to get this working properly in your custom template. The idea is to get this new code into your template before the tag. Keep reading and hopefully the explanation will illustrate the concept clear enough so you are able to adapt this hack to your custom template.

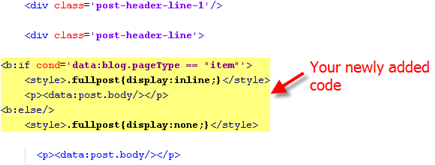
Add the following code below the

and
tags if you’ve got both.


The result should look something like this:

new-code-block.png

If you don’t have the default

tag then your result should look something like this instead. This is how it would be done in the MushBlue Blogger custom template:

new-code-block-mush.png

Notice in both examples that the code in yellow and the tags are the same — it’s just tag above it that will differ based on the template you’re using.

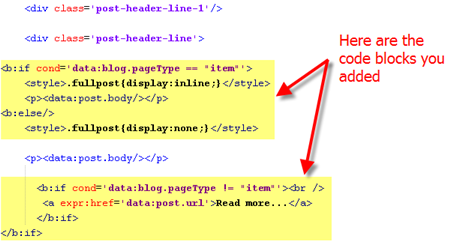
Now let’s add one more bit of code which will actually create the “read more” link in your post. This code will go below the tag so copy the following and paste it in. Feel free to change the “Read more…” text to whatever you want the link to look like. Be careful not to delete any other code during this process.


Read more...

Yes, there are supposed to be two tags in the above code so don’t think it’ s a mistake. The result should look like this:

new-code-block-2.png

This code will be the same no matter what template you are using. Just make sure it goes below the as shown in the image above.

Now let’s look at what the final result should be. Here’s the updated code block you just worked on all put together:

new-code-block-3.png

Ok, you’re all done editing the template code. Paste it back into your Blogger html window and save it. If you get an error, you made a mistake. The most common mistake is to accidentally delete a > or <>

Step #2 – Add a Class Tag in Your Default Post Template

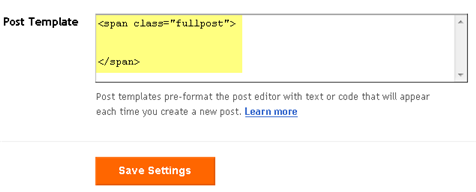
For this step, you need to navigate in your Blogger account to “Settings” => “Formatting” and scroll all the way down to the bottom. It’s the last option called “Post Template”. You’re going to paste in the following code:

You’ll want to keep the spaces in there which will make sense later. After you save this, it will look like this:

post-template2.png

Step #3 – Create a New Post

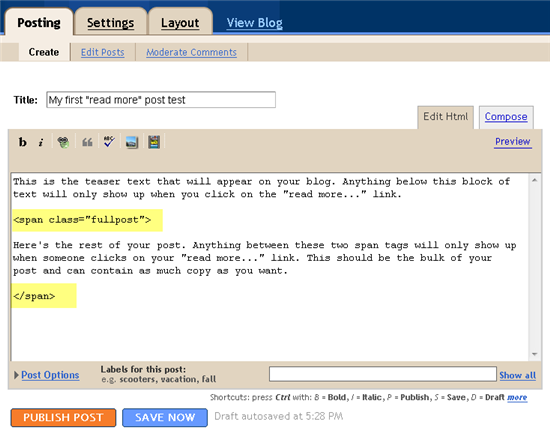
Ok, we’ve got everything all setup so it’s time to go and test it out. Hopefully you’ve got a new post in mind for your blog. If not, then we’ll just create a test post which you can later delete. When you click on the “Posting” tab, you’ll notice that the post text area is now pre-populated with the and tags. If not, then you didn’t save it properly so go back and re-read step #2.

So when writing your new post, anything you put above the tag will be the teaser text. The main body of your post needs to go in between the and tags in order for the “read more…” link to work properly. See the screenshot below. Sometimes pictures illustrate better than words.

post-template-result2.png

Now publish or preview your post to see the “read more” hack working on your blog. If it doesn’t show up for some reason, go back and run through the steps again. Most likely you pasted the code blocks in the wrong places. It’s difficult to troubleshoot these issues since each template can be unique so please make sure to double-check your template before asking for help in the comments section below.

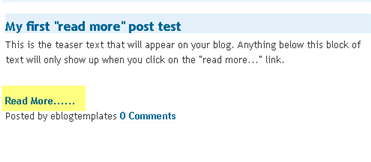
Here’s the live post with the “read more…” link properly working based on the text I used above in the post text area.

post-results.png

Additional Info

If you want to go back and update your old posts with this new “read more…” feature you can. Just go back and edit each post manually. Essentially you’ll need to paste in the and tags breaking apart the post into two parts.

For some posts, you might not want to use this feature at all. If that’s the case, just delete the and tags from within your new post text area. Then your new post will show up entirely just like it used to before you implemented this hack. Enjoy!

Monday, June 21, 2010

HOW TO DISABLE "RIGHT CLICK" IN BLOG

Hadoih...MAK pening ni, ada orang tanya macam mana nak elakkan orang tekan "right click" pada mouse di blog dia... Mak pun tak tau, tapi bila Mak browse internet, terjumpa pulak cara-caranya...

Sebenarnya, tujuan widget nie dibuat adalah untuk elakkan orang lain senang-senang jer copy barang kat blog dia...hahahaha..Mak tak kisah, u all nak amik apa-apa kat blog nie, amik le...

SELAMAT MENCUBA!!!

You might have seen websites with no right clicking on their pages. This is just to minimize the risk of content copy. The right mouse button won’t work in their sites, basically used to select contents & copy or to save images. Blocking or disabling right click will make other things work normally, people can view and surf everything, all they can’t do is copying any text or image from your site. And now we can apply this blocking trick to disable right click in blogger/blogspot blogs.

To block people from copying text or image from your blogger/blogspot blogs, you need to disable right click. And in order to do this, you need to add a code to your blog. This code needs to be added in the page elements page as a new widget. Follow the below steps.

  1. Log into your blogger dashboard.
  2. Navigate to your blog’s Layout >> Page Elements page.
  3. Now add a new widget by navigating to Add a Gadget >> HTML / JavaScript
  4. Add the following code to HTML / JavaScript box.
  5. function clickNS4(e){
    if (document.layers||document.getElementById&&!document.all){
    if (e.which==2||e.which==3){
    alert(message);
    return false;
    }
    }
    }

    if (document.layers){
    document.captureEvents(Event.MOUSEDOWN);
    document.onmousedown=clickNS4;
    }
    else if (document.all&&!document.getElementById){
    document.onmousedown=clickIE4;
    }

    document.oncontextmenu=new Function(“alert(message);return false”)

    // –>

  6. Save the widget and you are done.
Now no one can steal your contents as you have disabled right clicking on your blogger blog. But still I would like to advise you not to do this. It might affect innocent people from copying some necessary codes from your blog. You can deal with those people who steals your content in a legal way.

Sunday, June 20, 2010

WIDGET TOP COMMENTATORS UNTUK BLOG

How to Install the Top Commentators Widget For Blogger

Just use any of the Widget installers provided here. Provide your blog URL(in place of www.bloggerplugins.org ) in the Blog url: field of the widget installer.You can also set the number of commentators to be displayed and you can add the names to be filtered out. If multiple names are to be filtered out, then separate then using commas. Click Customize and then hit the Add Widget to Blog Button.


1) Widget Based On Recent 500 Comments.This will judge the top commentators from the latest 500 comments to your blog.

Add Top Commentators Widget to Blog


2) Widget Based On Recent 5000 Comments.This will judge the top commentators from the latest 5000 comments to your blog.This widget is only needed if your blog has high density of comment.I mean if you have more than 500 comments on your blog you can use this one..

Add Top Commentators Widget to Blog


Note:-Install the second widget only and only if your blog has lots and lots of comments.Else you should opt for the first one..

Kredit: http://www.bloggerplugins.org

LAMA SUNGGUH MAK BLOG MENYEPI...TAKPER NANTI MAK CUBA YANG TEBAIK.

WIDGET YANG MAK BARU POST NI SANGAT BERGUNA UNTUK U ALL SEMUA BAGI MENGHARGAI TUKANG2 KOMEN YANG DATANG KE BLOG KORANG...

SELAMAT MENCUBA...